Our Artwork Setup Guidelines
To help you get the best results, please follow these simple steps when preparing your files:
1. File Formats
We accept a variety of file formats, but the most common and preferred ones are:
- PDF (Portable Document Format): The best choice for print-ready files. PDFs ensure that fonts, images, and layout are preserved exactly as you intended.
- Adobe Illustrator (.AI) or Adobe InDesign (.INDD): Ideal for vector-based artwork (like logos and illustrations) and multi-page designs. Ensure all fonts are outlined and images are embedded.
- High-Resolution JPEG or TIFF: These can work for image-heavy designs, but ensure they are saved at a high resolution (300 DPI at actual print size).
Tip: Always use the original design file (e.g., AI, INDD) rather than exported images when possible to ensure maximum quality.
2. Resolution (DPI)
For sharp, professional prints, ensure that your artwork is at 300 DPI (dots per inch) at the actual size of the print. Low-resolution files (e.g., 72 DPI) can cause pixelation and poor image quality in the final print. Avoid enlarging images that were originally created for digital use, as this can lead to blurry results.
3. Color Mode: CMYK vs. RGB
When setting up your files for print, always use CMYK (Cyan, Magenta, Yellow, Black) color mode. RGB (Red, Green, Blue) is used for digital screens, but CMYK is the color model used in printing, ensuring that the colors are reproduced accurately.
Tip: Keep in mind that some vibrant colors seen on screens (like neon or bright reds) might look different when printed, as monitors use light, and printers use ink.
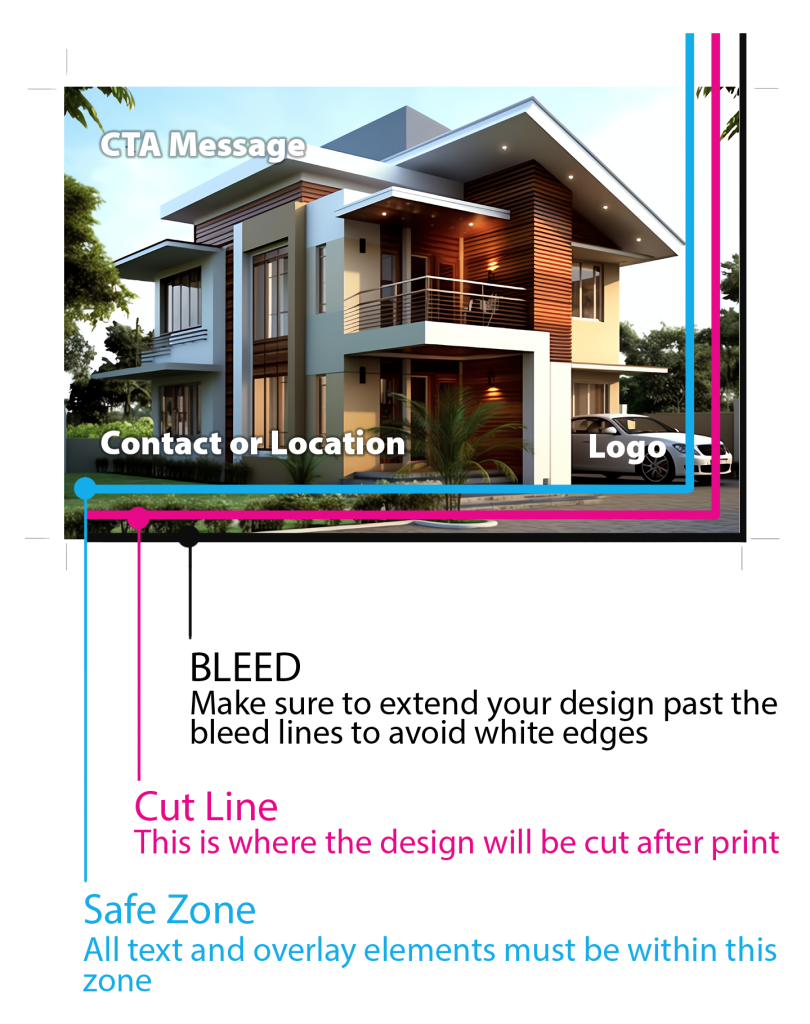
4. Bleed and Margins
To avoid unprinted edges or unwanted white borders, always include a bleed area in your artwork. Bleed is an extra 0.125” to 0.25” beyond the trim size (the final size of your print). This ensures that when the document is trimmed after printing, there is no white space along the edges.
Safe margin: Keep important text and elements at least 0.25” away from the trim line to prevent them from being cut off.
5. Fonts
To ensure your fonts print correctly, either embed the fonts in your file or convert them to outlines. This prevents font substitution during the print process and keeps your text looking exactly as intended. In programs like Illustrator and InDesign, you can easily convert text to outlines.
6. Color Profiles
For the best color consistency, use CMYK color profiles. If you’re using a specific color for branding, consider using Pantone colors or include a color swatch for reference. Be sure to embed any necessary color profiles in your PDF file to maintain color accuracy.
7. File Size
Make sure your file size isn’t too large for uploading. While large files often indicate high resolution, excessively large files can be cumbersome. Try to keep your file size manageable while maintaining quality. If you’re unsure, our team can assist with file compression or troubleshooting.
8. Proofing
Before submitting your files, be sure to thoroughly proof your artwork. Check for spelling errors, alignment issues, and color inconsistencies. It’s also a good idea to print a sample on your printer at home to catch any obvious design mistakes before sending the file to us.